Documentation

All you need to know about Green AI Assistant

Intro

About

Green AI Assistant is a powerful WordPress plugin designed to seamlessly integrate various AI providers, unlocking an array of functionalities directly within your WordPress dashboard. This innovative plugin empowers users to harness the capabilities of cutting-edge artificial intelligence for image manipulation, natural language processing, and audio processing.

Key Features

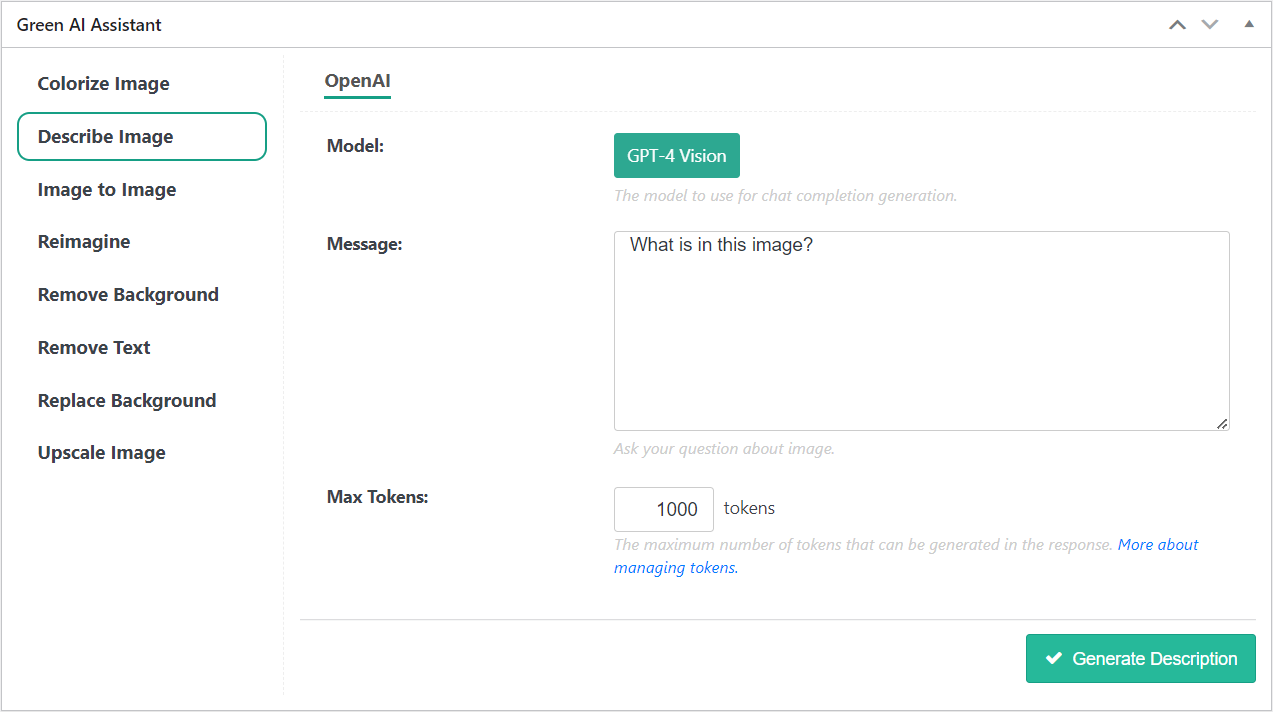
  • Image Processing. Use AI to create images based on textual descriptions, allowing for quick and efficient content creation. Generate multiple variations of an image, optimizing for different platforms or purposes. Easily remove or replace backgrounds in images, enhancing visual appeal and customization options.
  • Natural Language Processing. Enhance user engagement by utilizing AI-driven chat completion, providing intelligent and contextually relevant responses. Effortlessly translate text content into multiple languages, expanding your website’s accessibility and reach. Automatically generate concise and informative summaries of lengthy text, improving content readability.
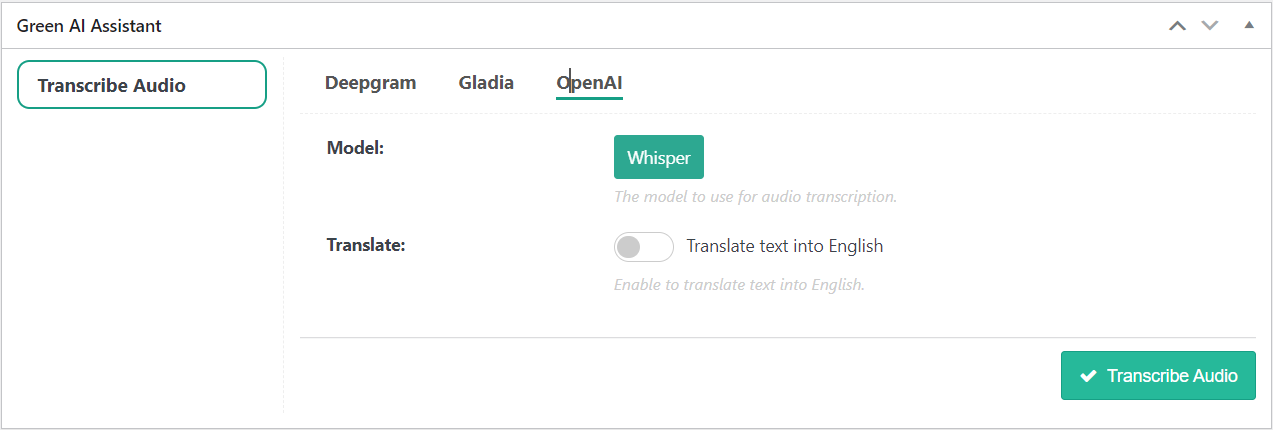
  • Audio Processing. Transcribe audio files into text, facilitating content creation, accessibility, and search engine optimization. Translate spoken content from one language to another, broadening your audience and catering to a global user base.
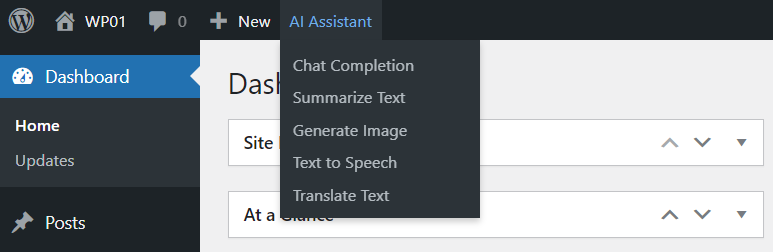
  • User-Friendly Interface. The Green AI Assistant plugin features an intuitive and user-friendly interface directly integrated into the WordPress dashboard. Easily toggle between different AI functionalities with a few clicks, making it accessible to users with varying levels of technical expertise.
  • Customization and Control. Configure and customize AI settings to suit your specific needs and preferences. Control the intensity and extent of AI processing for different tasks.
  • API Integration. Green AI Assistant seamlessly integrates with leading AI providers, ensuring access to state-of-the-art algorithms and technologies. Regular updates to the plugin ensure compatibility with the latest advancements in the field of artificial intelligence.
Harness the power of artificial intelligence effortlessly with Green AI Assistant, bringing advanced image, language, and audio processing capabilities directly to your WordPress website. Elevate your content creation and user experience to new heights with this comprehensive and versatile AI integration plugin.

IMPORTANT! Green AI Assistant utilizes functionality of many AI providers (such as OpenAI, StabilityAI, DeepAI, Microsoft Azure Computer Vision, etc.). To have their functionality available in WordPress dashboard, you have to enter their API credentials on plugin Settings page.

Back To Top

Disclaimer

We are constantly improving our plugin by adding new features and fixing bugs. Please keep the plugin updated and always use latest version. This documentation is related to actual version of the plugin, so don’t forget to check it from time to time.

  • Initial release: January 15th, 2024
  • Latest update: March 22nd, 2024
  • Version: 1.38

Back To Top

Requirements

Your WordPress-driven website and server must match the following requirements.

  • WordPress version 5.5 or higher.
  • PHP version 5.5 or higher.
  • MySQL version 5.0 or higher.

Back To Top

Installation

Green AI Assistant is a WordPress plugin and it is installed as regular WordPress plugin:

  1. Go to WordPress dashboard and click left side menu “Plugins >> Add New”.
  2. Click “Upload” link and upload zip-archive downloaded from CodeCanyon.
  3. Activate uploaded plugin.

If you have any difficulties with uploading zip-archive, please do it manually using FTP:

  1. Use any FTP-client to connect your server.
  2. Unzip archive downloaded from CodeCanyon.
  3. Upload unzipped folder to plugins directory: /wp-content/plugins/
  4. Go to WordPress dashboard, click left side menu “Plugins” and activate uploaded plugin.

Once installed and activated, plugin creates “AI Assistant” menu section in left side menu and “AI Assistant” menu in top admin bar. All further actions, related to plugin functionality, are done through these menus.

Back To Top

Updates

There are 2 ways to update the plugin.

  • Automatic update. To enable this feature you need put Item Purchase Code on Settings page (at the bottom). After that, updates will be pulled from our servers automatically. If for some reasons your server can not connect to update server, please do manual update.
  • Manual update. Download latest version of the plugin from CodeCanyon and overwrite exiting files in folder /wp-content/plugins/halfdata-ai-assistant/ by new ones.

You won’t lose any plugin’s data. They are stored in MySQL database.

Back To Top

Settings

Overview

Plugin settings are available through left side menu “AI Assistant” (submenu item “Settings”). All settings are devided into several sections:

  1. API Parameters
  2. Role Permissions and Limits
  3. License

Back To Top

API Parameters

All AI operations are performed by AI providers using their API. To access certain providers’ APIs, you need to provide their API credentials in the “API Parameters” section of the “Settings” page.

Back To Top

Role Permissions and Limits

By default all plugin functionality is available to administrators only, but you can grant specific access to certain user roles. This is done through the “Role Permissions and Limits” section of the “Settings” page.

The video below explains how to do that.

Back To Top

License

Green AI Assistant supports automatic update to latest version. To activate your license and make this feature enabled, you need to put your Item Purchase Code into the “License” section of the “Settings” page. Where can I find my Purchase Code?

Back To Top

Natural Language Processing Tasks

Overview

Green AI Assistant brings advanced natural language processing capabilities directly to your WordPress dashboard. This innovative tool empowers you to effortlessly handle various language-related tasks, including translation, chat completion, text summarization, image generation, and text-to-speech transformation, all within the familiar WordPress environment.
All natural language processing features are available through menu AI Assistant on top admin bar.

List of supported features (as well as utilized AI providers) is described below.

Back To Top

Generate Image

The “Generate Image” feature (also known as Text-To-Image) in Green AI Assistant leverages cutting-edge AI technology to transform text descriptions into captivating images. With this functionality, you can effortlessly bring textual concepts to life by providing a creative and visually appealing representation. Whether it’s illustrating ideas, crafting visual narratives, or simply adding a unique touch to content, the Generate Image feature enhances the content creation process by generating images directly from textual input. Explore the seamless integration of AI-powered image generation within your WordPress dashboard with Green AI Assistant.

The following AI providers support “Generate Image” feature. It means that you should put their API credentials (at least for one of them) on Settings page to have this feature available.

  • Bria
  • Clipdrop
  • DeepAI
  • Fusion Brain
  • MyMidjourney
  • OpenAI
  • StabilityAI

Step-by-step instruction how to use “Generate Image” feature.

  1. Make sure that you put valid API credentials for AI provider, which supports image generation.
  2. Go to “AI Assistant” menu on top admin bar and click “Generate Image”.
  3. Select desired AI provider and complete simple form to adjust transformation parameters (if available).
  4. Click “Generate Image” button. The process takes some time. When it’s finished you can review generated image.

The video below explains how to use “Generate Image” feature.

Back To Top

Text To Speech

The “Text-to-Speech” feature harnesses the power of AI to convert written text into natural-sounding audio. You can transform any textual content into an engaging and accessible audio experience with just a few clicks. This feature not only adds a dynamic dimension to content but also enhances accessibility for a broader audience. Choose from a variety of voices and accents to customize the audio output, ensuring that the generated speech aligns seamlessly with the tone and style of your content. Elevate your content accessibility and user engagement effortlessly with the Text-to-Speech feature in Green AI Assistant.

The following AI providers support “Text-to-Speech” feature. It means that you should put their API credentials (at least for one of them) on Settings page to have this feature available.

  • ElevenLabs
  • LOVO AI
  • Microsoft Azure
  • OpenAI

Step-by-step instruction how to use “Text-to-Speech” feature.

  1. Make sure that you put valid API credentials for AI provider, which supports text-to-speech transformation.
  2. Go to “AI Assistant” menu on top admin bar and click “Text To Speech”.
  3. Select desired AI provider and complete simple form to adjust transformation parameters (if available).
  4. Click “Generate Audio” button. The process takes some time. When it’s finished you can review generated audio.

The video below explains how to use “Text-to-Speech” feature.

Back To Top

Chat Completion

The “Chat Completion” feature utilizes advanced AI algorithms to generate insightful and contextually relevant responses based on user queries. This powerful feature transforms user questions into coherent and meaningful textual content, providing a valuable tool for content creation and interaction. By understanding the nuances of the inquiry, it ensures that the generated text aligns with the user’s intent, offering a dynamic and responsive way to engage with visitors. Elevate your content creation and user interaction with the Generate Text feature, bringing the sophistication of AI-generated responses directly to your WordPress environment.

The following AI providers support “Chat Completion” feature. It means that you should put their API credentials (at least for one of them) on Settings page to have this feature available.

  • AI21 Studio
  • Anthropic
  • Cohere
  • DeepSeek
  • Google AI
  • Mistral AI
  • OpenAI
  • OpenRouter
  • Perplexity

Step-by-step instruction how to use “Chat Completion” feature.

  1. Make sure that you put valid API credentials for AI provider, which supports chat completion feature.
  2. Go to “AI Assistant” menu on top admin bar and click “Chat Completion”.
  3. Select desired AI provider and complete simple form to adjust transformation parameters (if available).
  4. Click “Generate Response” button. The process takes some time. When it’s finished you can review generated text.

The video below explains how to use “Chat Completion” feature.

Back To Top

Summarize Text

The “Summarize Text” feature harnesses the power of AI to generate concise and coherent summaries based on provided text. This advanced functionality is designed to automatically analyze and distill lengthy content, extracting key information to produce a condensed and easily digestible summary. Ideal for processing articles, documents, or any textual input, the Summarize Text feature enhances efficiency by offering users a quick and informative overview without the need to sift through extensive content manually. This feature adds a valuable layer of automation to the summarization process, making it a powerful asset for content creators and information seekers alike within the WordPress environment.

The following AI providers support “Summarize” feature. It means that you should put their API credentials (at least for one of them) on Settings page to have this feature available.

  • Cohere

Step-by-step instruction how to use “Summarize Text” feature.

  1. Make sure that you put valid API credentials for AI provider, which supports text summarizing.
  2. Go to “AI Assistant” menu on top admin bar and click “Summarize Text”.
  3. Select desired AI provider and complete simple form to adjust transformation parameters (if available).
  4. Click “Generate Summary” button. The process takes some time. When it’s finished you can review generated text.

The video below explains how to use “Text-to-Speech” feature.

Back To Top

Translate Text

The “Translate Text” feature employs advanced AI technology to seamlessly translate provided text into multiple languages. This powerful functionality ensures accurate and contextually relevant translations, breaking down language barriers and expanding the accessibility of your content. Whether you’re managing a multilingual website, reaching a global audience, or simply looking to enhance user experience, the Translate Text feature simplifies the translation process. With its intuitive interface and precise language translation capabilities, it empowers you to effortlessly transform content while maintaining linguistic accuracy and nuance. Unlock a world of possibilities by integrating the Translate Text feature into your WordPress environment, offering a more inclusive and globally connected experience for your audience.

The following AI providers support “Translate Text” feature. It means that you should put their API credentials (at least for one of them) on Settings page to have this feature available.

  • DeepL

Step-by-step instruction how to use “Translate Text” feature.

  1. Make sure that you put valid API credentials for AI provider, which supports translation.
  2. Go to “AI Assistant” menu on top admin bar and click “Translate Text”.
  3. Select desired AI provider and complete simple form to adjust transformation parameters (if available).
  4. Click “Translate” button. The process takes some time. When it’s finished you can review generated text.

The video below explains how to use “Translate Text” feature.

Back To Top

Computer Vision Tasks

Overview

Green AI Assistant provides powerful Computer Vision capabilities directly into your WordPress dashboard. This plugin is designed to enhance your media management and editing experience, offering a suite of features to transform and optimize images effortlessly.
All computer vision features are available through “Green AI Assistant” metabox on Media Library item page.

List of supported features (as well as utilized AI providers) is described below.

Back To Top

Colorize Image

The “Colorize Image” feature introduces a transformative dimension to image editing by leveraging artificial intelligence to seamlessly infuse black-and-white images with vibrant color. This advanced tool analyzes the content of grayscale pictures and intelligently applies realistic and contextually appropriate colors to different elements within the image. By automatically selecting harmonious color palettes and offering customization options, this AI-driven capability ensures that the colorized output not only retains the essence of the original scene but also allows users to tailor the visual experience to their preferences, delivering stunning and realistic results.

The following AI providers support “Colorize Image” feature. It means that you should put their API credentials (at least for one of them) on Settings page to have this feature available.

  • DeepAI

Step-by-step instruction how to use “Colorize Image” feature.

  1. Make sure that you put valid API credentials for AI provider, which supports creating image colorization.
  2. Go to Media Library, select image and find “Green AI Assistant” metabox.
  3. Click “Colorize Image”.
  4. Select desired AI provider and complete simple form to adjust transformation parameters (if available).
  5. Click “Colorize Image” button. The process takes some time. When it’s finished you can review generated image.

The video below explains how to use “Colorize Image” feature.

Back To Top

Describe Image

The “Describe Image” feature employs AI to revolutionize image understanding and accessibility. By leveraging advanced algorithms, this tool analyzes the content of an image, recognizing objects, scenes, and contextual details. The result is an accurate and contextually rich description that encapsulates the visual essence of the image. Ideal for enhancing both SEO and user engagement, the “Describe Image” feature provides an invaluable solution for automatically generating comprehensive and human-like textual descriptions for images, ensuring accessibility for individuals with visual impairments and optimizing searchability for a diverse range of online content.

The following AI providers support “Describe Image” feature. It means that you should put their API credentials (at least for one of them) on Settings page to have this feature available.

  • Google AI
  • OpenAI

Step-by-step instruction how to use “Describe Image” feature.

  1. Make sure that you put valid API credentials for AI provider, which supports creating image description.
  2. Go to Media Library, select image and find “Green AI Assistant” metabox.
  3. Click “Describe Image”.
  4. Select desired AI provider and complete simple form to adjust transformation parameters (if available).
  5. Click “Describe Image” button. The process takes some time. When it’s finished you can review generated text.

The video below explains how to use “Describe Image” feature.

Back To Top

Upscale Image

The “Upscale Image” feature is an innovative tool that leverages the power of artificial intelligence to enhance the resolution and visual quality of low-resolution images. Using advanced upscaling algorithms, this feature analyzes image content and intelligently extrapolates additional details, resulting in a higher-resolution output that maintains clarity and sharpness. By employing deep learning techniques, the AI-driven “Upscale Image” capability goes beyond traditional upscaling methods, ensuring that the upscaled images exhibit enhanced textures and finer details.

The following AI providers support “Upscale Image” feature. It means that you should put their API credentials (at least for one of them) on Settings page to have this feature available.

  • Clipdrop
  • DeepAI
  • StabilityAI

Step-by-step instruction how to use “Upscale Image” feature.

  1. Make sure that you put valid API credentials for AI provider, which supports upscaling images.
  2. Go to Media Library, select image and find “Green AI Assistant” metabox.
  3. Click “Upscale Image”.
  4. Select desired AI provider and complete simple form to adjust upscaling parameters (if available).
  5. Click “Upscale Image” button. The process takes some time. When it’s finished you can review generated image.

The video below explains how to use “Upscale Image” feature.

Back To Top

Reimagine

The “Reimagine” feature (also known as “Image Variation”) is an application of artificial intelligence that transforms image creation by leveraging the content and style of a reference image to generate entirely new visuals. This innovative tool utilizes advanced algorithms to analyze the structure, patterns, and artistic elements of the input image, allowing it to reimagine and synthesize unique compositions. Whether emulating artistic styles, producing novel interpretations, or crafting imaginative variations, the “Reimagine” feature seamlessly blends creativity and technical prowess. By understanding the essence of the original image and applying it in a transformative manner, this AI-driven capability empowers you to explore fresh perspectives, fostering a new realm of possibilities for digital expression and visual storytelling.

The following AI providers support “Reimagine” feature. It means that you should put their API credentials (at least for one of them) on Settings page to have this feature available.

  • Clipdrop
  • OpenAI

Step-by-step instruction how to use “Reimagine” feature.

  1. Make sure that you put valid API credentials for AI provider, which supports creating image variants.
  2. Go to Media Library, select image and find “Green AI Assistant” metabox.
  3. Click “Reimagine”.
  4. Select desired AI provider and complete simple form to adjust transformation parameters (if available).
  5. Click “Reimagine” button. The process takes some time. When it’s finished you can review generated image.

The video below explains how to use “Reimagine” feature.

Back To Top

Remove Background

The “Remove Background” feature is an advanced tool harnessing the power of AI to effortlessly eliminate backgrounds from images. Using cutting-edge algorithms, this feature precisely identifies and isolates the main subject within the image, allowing users to achieve a clean and professional look without the need for intricate manual editing. Ideal for e-commerce, graphic design, or content creation, this AI-driven capability ensures a seamless removal process that preserves intricate details, such as hair or fine textures, while maintaining the integrity of the foreground subject. With just a few clicks, you can transform images by isolating subjects, allowing for versatile applications and enhancing the visual appeal of photos for a variety of creative and commercial purposes.

The following AI providers support “Remove Background” feature. It means that you should put their API credentials (at least for one of them) on Settings page to have this feature available.

  • Clipdrop
  • Microsoft Azure
  • PhotoRoom

Step-by-step instruction how to use “Remove Background” feature.

  1. Make sure that you put valid API credentials for AI provider, which supports removing background from image.
  2. Go to Media Library, select image and find “Green AI Assistant” metabox.
  3. Click “Remove Background”.
  4. Select desired AI provider and complete simple form to adjust transformation parameters (if available).
  5. Click “Remove Background” button. The process takes some time. When it’s finished you can review generated image.

The video below explains how to use “Remove Background” feature.

Back To Top

Remove Text

The “Remove Text” feature is a sophisticated tool harnessing the capabilities of artificial intelligence to seamlessly eliminate text overlays from images. By employing advanced algorithms, this feature precisely analyzes the image content, identifies text elements, and intelligently removes them without compromising the surrounding visual details. Ideal for enhancing the clarity and aesthetic of photos, this AI-driven capability ensures a clean and efficient text removal process, allowing you to repurpose images for various creative and professional applications. From eliminating watermarks to refining promotional graphics, the “Remove Text” feature provides a user-friendly solution that streamlines the editing process and elevates the visual quality of images with ease.

The following AI providers support “Remove Text” feature. It means that you should put their API credentials (at least for one of them) on Settings page to have this feature available.

  • Clipdrop

Step-by-step instruction how to use “Remove Text” feature.

  1. Make sure that you put valid API credentials for AI provider, which supports removing text from image.
  2. Go to Media Library, select image and find “Green AI Assistant” metabox.
  3. Click “Remove Text”.
  4. Select desired AI provider and complete simple form to adjust transformation parameters (if available).
  5. Click “Remove Text” button. The process takes some time. When it’s finished you can review generated image.

The video below explains how to use “Remove Text” feature.

Back To Top

Replace Background

The “Replace Background” feature is a transformative tool that harnesses the power of AI to redefine the visual narrative of an image by seamlessly replacing its background. Using advanced algorithms, this feature intelligently identifies the foreground subject, allowing you to effortlessly swap out the existing background with a new one. Whether for creative experimentation, professional photography, or enhancing visual appeal, this AI-driven capability ensures precision and realism in the replacement process. The “Replace Background” feature opens up a world of creative possibilities, allowing for easy adaptation of images to suit various contexts and artistic visions.

The following AI providers support “Replace Background” feature. It means that you should put their API credentials (at least for one of them) on Settings page to have this feature available.

  • Clipdrop
  • PhotoRoom

Step-by-step instruction how to use “Replace Background” feature.

  1. Make sure that you put valid API credentials for AI provider, which supports replacing background.
  2. Go to Media Library, select image and find “Green AI Assistant” metabox.
  3. Click “Replace Background”.
  4. Select desired AI provider and complete simple form to adjust transformation parameters (if available).
  5. Click “Replace Background” button. The process takes some time. When it’s finished you can review generated image.

The video below explains how to use “Replace Background” feature.

Back To Top

Audio Processing Tasks

Overview

Green AI Assistant provides powerful Audio Processing capabilities directly into your WordPress dashboard. This plugin is designed to enhance your media management and editing experience, offering a suite of features to process audio effortlessly.
All audio processing features are available through “Green AI Assistant” metabox on Media Library item page.

List of supported features (as well as utilized AI providers) is described below.

Back To Top

Transcribe Audio

The “Transcribe Audio” feature is a transformative tool that harnesses the power of artificial intelligence to automatically convert spoken content within audio files into accurate and readable text. By employing advanced speech recognition algorithms, this feature ensures precise transcription, capturing nuanced details and accurately transcribing diverse audio content. From podcasts and interviews to business meetings, the AI-driven “Transcribe Audio” capability not only saves time but also enhances accessibility by providing a reliable and efficient solution for converting spoken words into written form.

The following AI providers support “Transcribe Audio” feature. It means that you should put their API credentials (at least for one of them) on Settings page to have this feature available.

  • AssemblyAI
  • Deepgram
  • Gladia
  • OpenAI

Step-by-step instruction how to use “Transcribe Audio” feature.

  1. Make sure that you put valid API credentials for AI provider, which supports transcribing audio.
  2. Go to Media Library, select audio file and find “Green AI Assistant” metabox.
  3. Click “Transcribe Audio”.
  4. Select desired AI provider and complete simple form to adjust transcribing parameters (if available).
  5. Click “Transcribe Audio” button. The process takes some time. When it’s finished you can review transcription.

The video below explains how to use “Transcribe Audio” feature.

Back To Top